The InfoTime Dashboard gives an overview of how the system currently stands. (Fig 1).
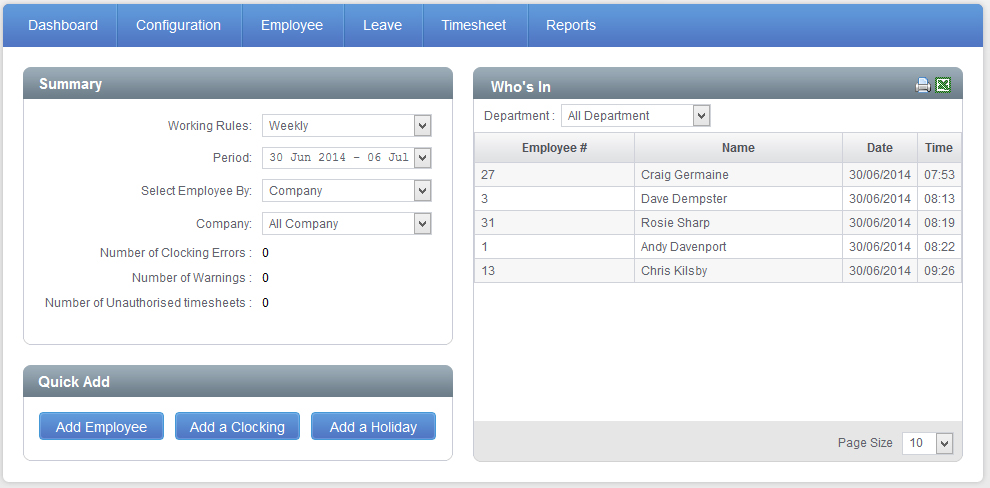
Fig 1
The Dashboard is split down into three sections. Each section deals with different information. The Summary details with warnings and errors for a payperiod. The Who’s In section shows a list of who is currently clocked in. The Quick Add section gives quick access to a number of common tasks.
Summary
By default the Summary section will show information regarding this week. The first drop down menu allows you to filter for which Working Rule you are looking at. Once you have set the Working Rule you can select the Pay Period you wish to view (By default these will be set to the first Working Rule in your database and the current Pay Period).
You can then filter for which employees you see using the Select Employees by drop down menu.
Underneath is a list of the Number of Clocking Errors, Number of Warnings and Number of Unauthorised timesheets.
Clocking Errors
A Clocking Error is when an employee makes a mistake with their clocking that stops the system from calculating their hours without input with from the user. The usual cause of this would be an employee forgetting to clock. If an employee has a clocking error then it will show when you look at the employee’s timesheet for that period. It will also show in the Number of Clocking Errors on the Summary section of the Dashboard.
If the Number of Errors on the Summary section is greater than zero then you can click on the number to see a list of all the current clocking errors for the selected criteria (Fig 2).
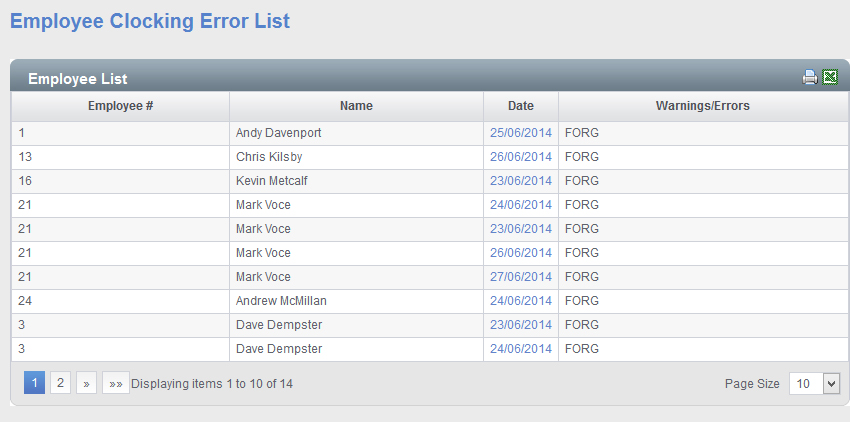
Fig 2
If you click on the date relating to for a Clocking Error then the system will load that employee’s Timesheet for that Period. The day for the error occurred will be marked FORG in the Warning column. You can then Edit the employee’s clockings for the day to rectify the error. Once you have fixed the error, close the Timesheet window to return back to the list of errors, the error you just fixed will be removed from the list.
Warnings
Warnings are a secondary notification, when a warning is generated the system is warning you that an employee has does something that is unusual that you might like to review. Warnings are things such as an employee clocking in late, clocking out early or not clocking in a day where they are schedule to work. Unlike Clocking Errors, Warnings generated by the system will not stop the system from calculating the employee’s hours for that day.
If there are any Warnings in the selected Period then the Number of Warnings will be above zero. If this number is greater than zero then clicking it will bring up a list of the Warnings for the selected criteria (Fig 3).
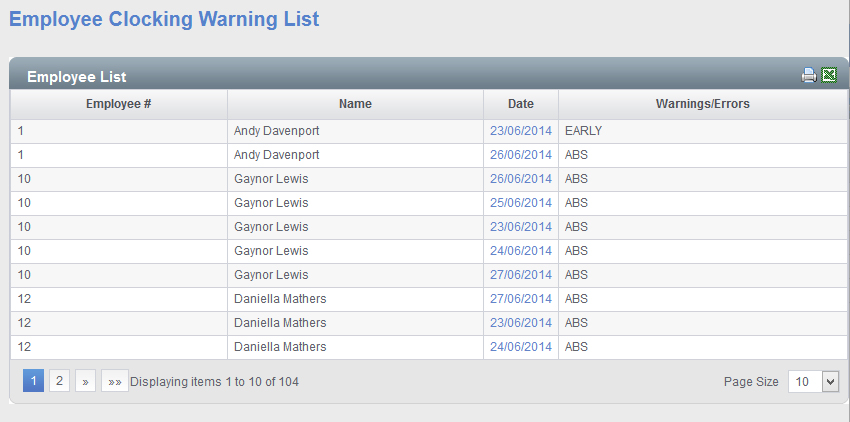
Fig 3
As with the Clocking Errors list, clicking on the date will load the employee’s Timesheet for that period where you can review the error. Unlike Clocking Errors, Warnings are for your information purposes only and you do not need to adjust the clockings to fix them.
Unauthorised Timesheet
It is possible for a supervisor to log into InfoTime and authorise an employee’s timesheet for payment after it has been reviewed. This is an optional feature that does not have to be used. However if you are using it when you look at a Pay Period on the Dashboard the number of Unauthorised Timesheets will be the number of Timesheets for that period waiting for a supervisor to authorise them.
If there are any Unauthorised Timesheets then the Number of Unauthorised timesheets will be greater than zero. Clicking the number will load the Timesheet Summary pay showing the employees with Unauthorised Timesheets (Fig 4).
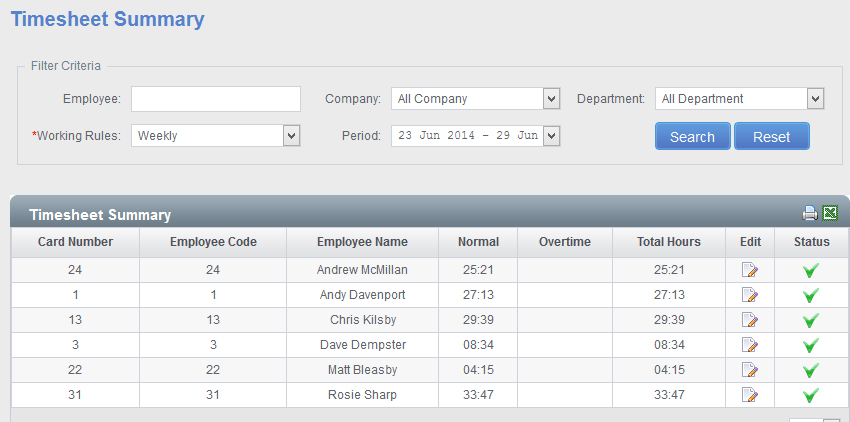
Fig 4
Clicking the Edit button will load the employee’s timesheet for the selected period allowing you to review it. Clicking the tick under Status will authorise the timesheet for that employee.
The Unauthorised Timesheets feature is an optional feature. If you do not use it then this section can be ignored, it will not stop you from running reports on your employees.
Who’s In
The Who’s In section shows a list of the employees that are currently classed as clocked in. This list can be filtered by department or company. This list can be printed out or sent to Excel by using the icons at the top right of the section (highlighted in red in Fig 5).
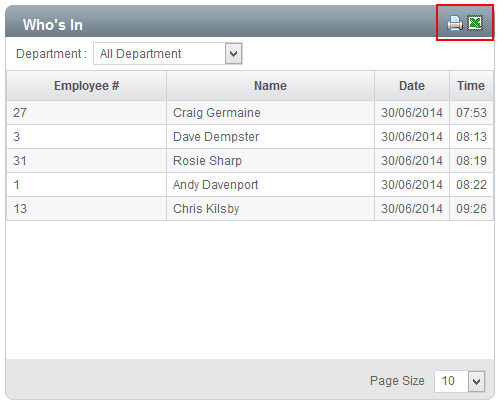
Fig 5
Quick Add
The Quick Add section provides quick access to common tasks you might need to do on a regular basis such as add a new employee, add a clocking or add a holiday (Fig 6).
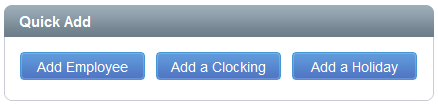
Fig 6
Add Employee
Clicking Add Employee will load the Manage Employee screen (Fig 7).

Fig 7
You can then enter the details for the employee. Please refer to the Employee File – Add Employee section on page xx for more information.
Add a Clocking
Clicking the Add a Clocking button will load the Add Clocking window (Fig 8).
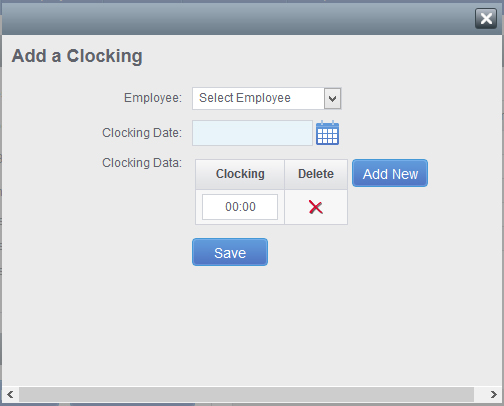
Fig 8
From the Employee drop down select the employee you wish to add a clocking for. Then set the date you wish to add the clocking on using the calendar icon next to Clocking Date.
Finally enter the clocking time in the box. If more than one clocking needs to be added for this day click Add New and second box will be added. Once you have entered the clocking click Save.
Add a Holiday
Clicking Add a Holiday will load the Manage Absence Booking window (Fig 9).
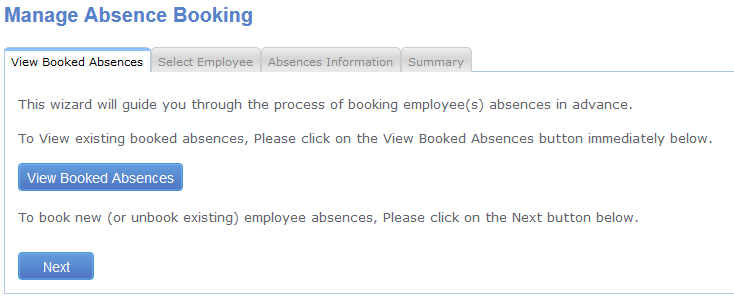
Fig 9
Click Next.
You will then be asked to select the employee. This can be done by typing in their employee number, selecting their department or company and then clicking Search. A list of all matching employees will be shown from which you can select the correct employee (Fig 10).
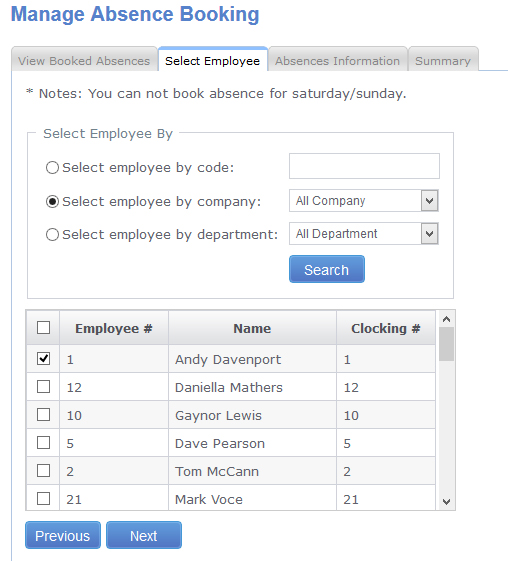
Fig 10
Once you have selected the employee click Next.
A new screen will load where you can select the type of absence to be taken and the date range (Fig11).
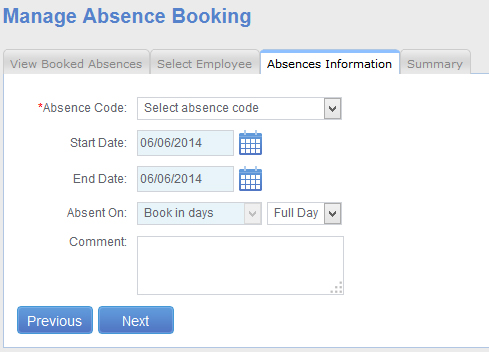
Fig 11
Click the drop down menu for Absence Code and select the correct code for this instance of leave.
User the calendar icon next to Start Date and End Date to select the start and end date of this instance (if one day the start and end dates should be the same).
Select whether this is a full or a half day instance of leave.
You can enter a comment about why this leave instance is been taken (i.e. the illness when the employee books sick)
Once you have entered these details click Next.
The Summary page will load (Fig 12).

Fig 12
If the leave booked effects the employee’s leave entitlement then the summary will show the employees allocated leave, the total number of days taken so far and their remaining leave entitlement. A suggested number of booking days will also be shown, this can be amended should the number of days you wish to deduct from their remaining entitlement be different.
If you are happy with the settings for this booking click Book Absence. Otherwise click Previous to go back and amend the booking.