To be able to use InfoTime to calculate the hours worked by your employee you need to setup a Working Rule. Each Working Rule is a collection of settings that can be applied to an employee which govern things should as how the clocking times are rounded, when a break should be deducted and when an employee would be working at any overtime rates.
To create a new Working Rule from the menu bar at the top go to Configuration – Working Rules (Fig 1).
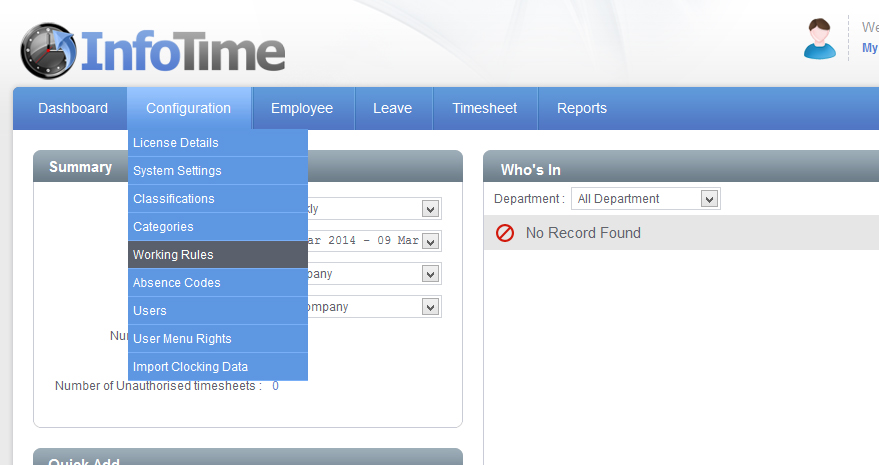
Fig 1
The Manage Working Rules screen will load, showing a list of all the Working Rules currently setup in your system. To add a new one click the Add New button (Fig 2).
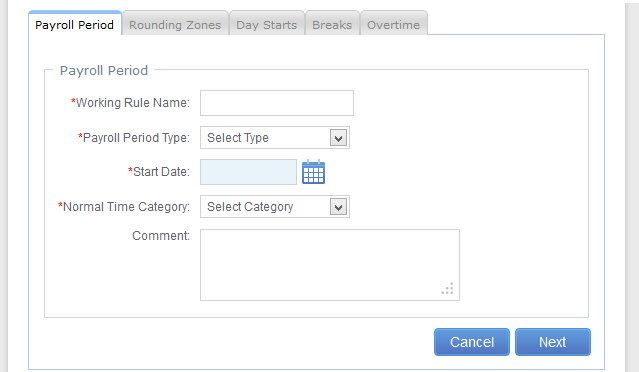
Fig 2
In the Working Rule Name box you can enter any name that will make it easy for you to identify this Working Rule when applying it to an employee i.e. Normal, Standard, 40 Hours Per Week, etc.
The Payroll Period Type controls how often this Working Rule will create payroll totals. It also governs the date range over which a Period Overtime rule is applied, for example if the employee had a period overtime of 40 hours a week at normal time before they get over time the Payroll Period Type would be set to Weekly. The options are Weekly, Bi Weekly, Four Weekly and Monthly. These can be selected from the dropdown menu.
The Start Date should be set to match the start of your Payroll Period. For instance, if you are on a Weekly Payroll Period that runs Monday to Sunday the Start Date should be set to a Monday. If you are on a Monthly Payroll Period that runs from the 25th of every month then the Start Date should be set to the 25th of the Month. You can click on the calendar icon to select the Start Date
The Normal Time Category should be set to the category you’ve setup to be your normal time category.
Once you have set these values click Next.
On the next page you can set the rounding that is applied to in and out clockings throughout the day (Fig 3).

Fig 3
The day is split up into a number of Rounding Zones. Each zone allows you to apply different roundings to the employee’s clockings depending on when the employee clocks.
The Before Shift Rounding Zone sets the roundings applied when the employee clocks in or out before their scheduled start time.
The During Shift Rounding Zone sets the roundings applied when an employee clocking in or out between their scheduled start and finish time.
The After Shift Rounding Zone sets the roundings applied when an employee clocks in or out after their scheduled finished time.
In each of these zones you can set a Rounding and Grace time for In and Out clockings. This allows you to specify if you want to round clocking times to an increment of your choice as well how long before the clocking is rounded up rather than down. For example if employees were allowed to clock in up to two minutes late and still get paid from their start time but anything after two minutes is rounded to the next quarter you would set the Rounding on in clockings to 15 and the Grace to 2.
The Round Forward and Round Back Zones work slightly different. The Round Forward zone deals with what happens if the employee clocks in just before their Scheduled Start Time. If the Round Forward Zone is set to 30 and the employee is supposed to start at 9am, if the employee clocks in between 8:30 and 9:00 the clocking will be rounded straight to 9. This is to allow for employees who turn up early, clock in but then don’t start work until their Scheduled Start Time.
The Round Back Zone is a similar idea except it relates to when an employee clocks out after their finish time. If this is set to 15 and the employee is supposed to finish at 15:00, if the employee clocks out between 15:00 and 15:15 they will only get paid to 15:00. There is no Grace setting on the Round Forward and Round Back Zone.
Once you have set your Rounding Zones, click Next.
On the next screen you can set the start point of the day (Fig 4).
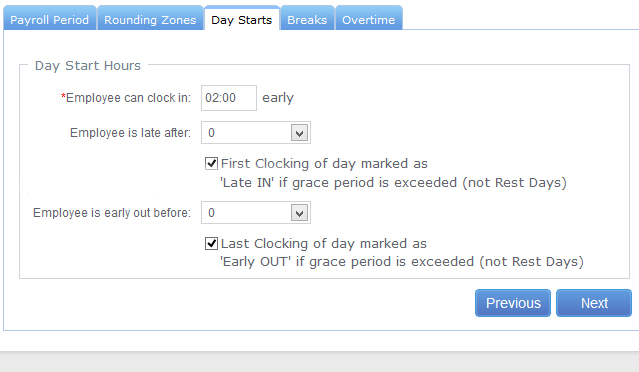
Fig 4
Normally a day would be classed as starting and finishing at midnight, however as employees might work past midnight we define a start and finish time for the day based on the employee’s scheduled start time. This can be any value, but it’s advised to make it a minimum of 2 hours.
Underneath are settings for when the system should generate warnings regarding late arrivals and early departures. The box marked “Employee is late after” specifies how many minutes late the employee can turn up before the system generates a warning saying he has clocked in late. The tick box below must also be ticked for this warning to be generated.
Similarly there is a setting for “Employee is early out before” this governs the number of minutes the employee is allowed to clock out early without a warning being generated saying they have left early. As with the previous setting the tick box also needs to be selected for the warning to be generated.
Once you have set these options, click Next.
The next section will deal with any breaks that the employee might be entitled to (Fig 5).
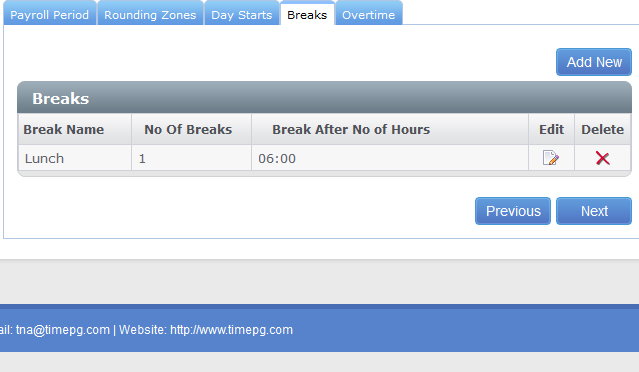
Fig 5
Multiple break rules can be applied to the employee, which one the system uses when processing the hours for a given day will be determined by the length of time that the employee works on that day.
To add a new rule click Add New. The Manage Breaks screen will load allowing you to enter the settings for this break (Fig 6).
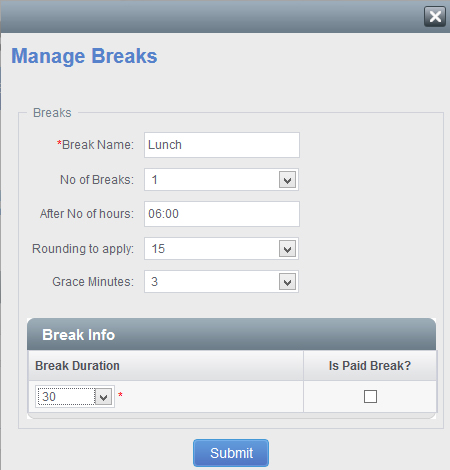
Fig 6
The Break Name is a compulsory field but can be any name of your choosing. In the number of breaks enter the number of breaks the employee is entitled to. In the box marked After No of Hours enter the number of hours after which this break should be deducted.
The Rounding to apply and Grace Minutes settings control what the system will do if the employee takes too long on their break. If set as shown in Fig 6 if the employee takes more than 3 minutes extra on their break they would be deducted an extra 15 minutes.
Once you have set the number of breaks you will be given the option to specify the Break Duration for each break and also whether the break is paid or not.
When a break is set as unpaid, if the employee clocks the break and takes less than the number of minutes specified in the Break Duration box then the system will round the value up to the number of minutes specified in the Break Duration box. If the employee takes more than the number of minutes specified in the Break Duration box then the system will round the total length of the break based on the rounding rules specified and deduct that value from the employee’s hours for the day. If the employee does not clock the break then the system will deduct the full length of the break.
When a break is set as paid, if the employee clocks the break and takes less than the number of minutes specified in the Break Duration box then nothing is deducted from their hours for the day. If the employee takes longer than the time specified in the Break Duration box then the length of the break is rounded in accordance with the specified rounding rules and the anything over the Break Duration is deducted from the employee’s hours. If the employee does not clock then nothing is deducted.
If the employee does not work more than the number of hours specified in the box After No of hours then the break rule will not be applied and any clockings made by the employee will be rounded in accordance with the Rounding Zones set up earlier. If the employee gets more break the longer he works then multiple break rules can be setup i.e. if the employee works 6 hours he is entitled to a 30 minute break, if he works more than 12 hours he is entitled to a 45 minute break a rule will need to be set up for each option and then system will apply the correct rule based on the length of time worked.
Once you have set these options click Submit to save the break rule.
If you have entered all your break rules click Next to proceed.
The final screen on the Working Rules is the Overtime Options (Fig 7).
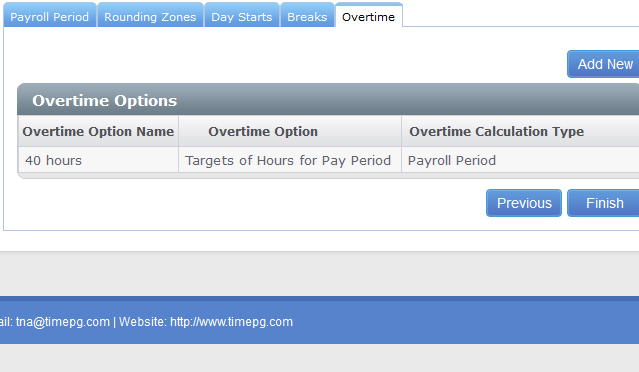
Fig 7
If all hours working on this working rule are paid at normal time then you do not need to enter any over time settings and can simply click Finish.
If your employee do get paid overtime depending on certain conditions then the rules can be setup from here. To add an Overtime Option click Add New, the Manage Overtime Options screen will load (Fig 8).
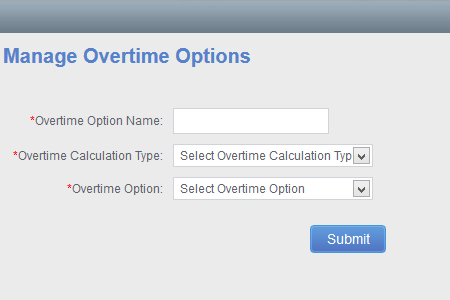
Fig 8
The Overtime Option Name is a name of your choosing. Enter value that gives a description of the rule i.e. if the rule gives overtime after the employee has worked 40 hours at normal time in the pay period you could call it 40Hr Rule.
You are then asked for the Overtime Calculation Type. There are two options, Daily or Payroll Period. Daily would be for where employees can earn overtime after they have worked a set number of hours in a day. Payroll Period would be where overtime is only earned after an employee has reached a set number of hours for the whole of the Payroll Period.
After Selecting the Overtime Calculation Type you must then select the Overtime Option. The list of options depends on the Overtime Calculation Type picked.
Daily Overtime
| Overtime Option: | Description |
|---|---|
| Target of Hours Per Day | With this option an hours target for normal time is specified in the Working Rule. Once the employee works over this number of hours on a daily basis they are considered to be on overtime. You can specify the category to which hours over the target are sent. You can also specify a target on this overtime category should the employees get paid at an even higher rate later i.e. 8 hours at normal time, 2 hours at OT 1 and then everything else at OT 2. Every day has the same target with this rule. |
| Pay a Day at a Set Rate | When this method is chosen you will be shown a table with each day of the week and you can select the category for that day. All hours worked on that day will be paid at the chosen category. |
| Daily overtime targets for each daily schedule | This method is similar to Target of Hours Per Day, except that the overtime target can be different on each day. When it is selected you will be asked to enter a target for the day when applying a Start and Finish time to an employee in the Schedule Planner screen. You will enter any additional overtime targets here. |
| Daily overtime targets set by expected hours | As above except no target is entered when setting the Start and Finish times. Instead the system works out the hours the employee is expected to work on that day and uses this as the normal time target. |
Period Overtime
| Overtime Option | Description |
|---|---|
| Target of hours for Pay Period | This method is similar to the Daily method “Target of Hours Per Day” except this time the target entered is for the total number of hours at normal time over the length of the payroll period. |
| Period overtime target set by expected hours | As with the Daily method “Daily overtime targets set by expected hours” the system will calculate the total number of hours the employee is scheduled to work over the Payroll Period and then use this as the target for normal time. |
Once you have setup your Overtime Rule click Submit to save it.
You can now click Finished to save your Working Rule.